The content below was written for previous expansions and is likely outdated for the current expansion content. The content below are saved purely for archiving purposes.
You can view current content information at the main PLD Resources page.
6.0-6.2 Endwalker Resources (Pre-rework)
Intro & Rotation Guide
This is a mirror of the guide written by nikroulah#1605, also hosted on The Balance.
Paladin Playstyle
The Paladin rotation revolves around its two main buffs: Fight or Flight, which heavily buffs all physical damage, and Requiescat, which buffs spells and enables the use of Confiteor. Defensively, Paladin has strong party mitigation as well as targeted mitigation for your co-tank or party members.
Core Concepts
There are a few key concepts that are fundamental to the game and carry over between jobs.
- Keeping your GCD on cooldown is one of the most important parts of playing any job. Pressing something wrong is almost always better than pressing nothing at all.
- As a primarily melee job, it’s important to know how to keep melee uptime on the boss. This includes knowing when mechanics snapshot and where you can greed for extra GCDs before and after disengaging for mechanics.
- Keep oGCDs on cooldown. Damaging oGCDs should be used roughly as they come off cooldown, as long as using them wouldn’t delay your next GCD due to animation lock.
The Basic Rotation
General Notes
![]() The potion used is whatever the current tier’s Strength potion is (as of Savage release in patch 6.05, it is the Grade 6 Tincture of Strength).
The potion used is whatever the current tier’s Strength potion is (as of Savage release in patch 6.05, it is the Grade 6 Tincture of Strength).
At high latency, if double weaves would cause your GCD to clip, move oGCDs around to stick to single-weaving.
Full FoF Opener
A simple, general-use opener for encounters with unknown constraints. This kind of opener is less effective for most kill times as of patch 6.08, but is a go-to when first learning how an encounter lines up.
Goals for the opener include:
- Apply Goring Blade early
- Use damaging off-global cooldowns (oGCDs) inside tincture and raid-buff windows. Most raid-buffs will come out shortly before the 4th GCD).
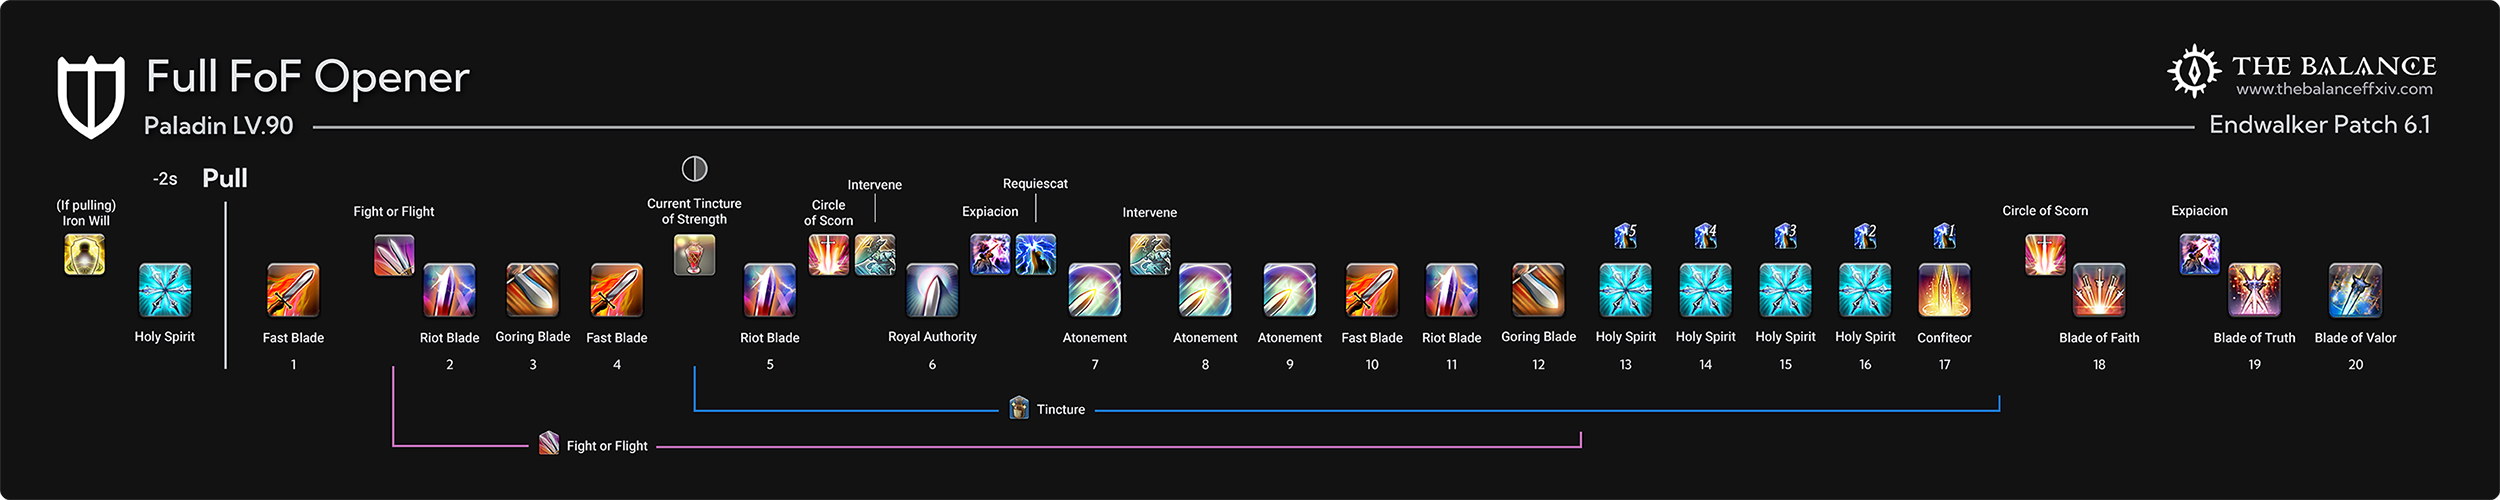
Opener Notes:
- We pull with a precast Holy Spirit as a medium-potency GCD that only costs half a GCD (due to precasting). Pulling with Shield Lob would be less potency and starts the GCD rolling later while pulling with Intervene moves an Intervene out of Fight or Flight.
- Since the Requiescat oGCD itself does damage, and the Requiescat buff lasts for a long time, we use Requiescat early in the opener to put it under raid buffs like Bard’s Battle Voice or Dancer’s Technical Finish.
If you have high ping, Tincture should be used BEFORE first Goring Blade, oGCDs should be used earlier, and all oGCDs should be single-weaved if clipping on double weaves would occur.
-18s Opener
This is a versatile opener which is most compatible with a wide range of potential kill times, and/or encounters which require an early Requiescat usage due to potential downtime.
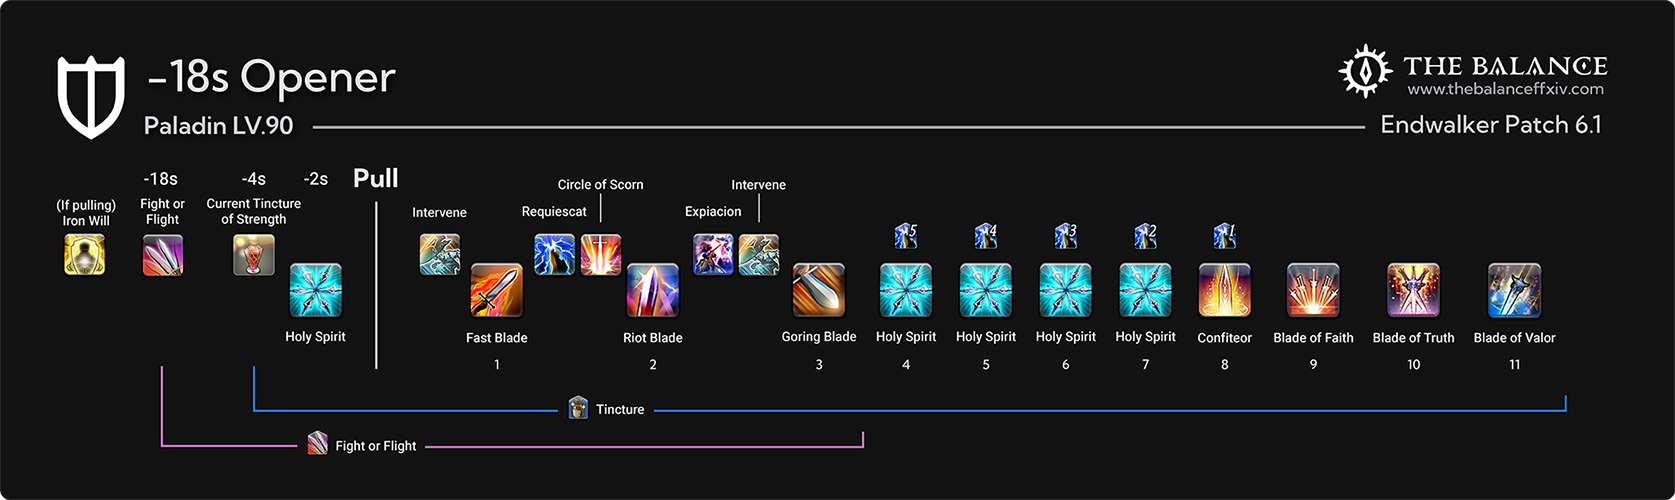
This opener leads into a standard loop. Use second tincture before second Riot Blade in the 6 minute FoF window to avoid drifting oGCDs, or before third Atonement in the 6 minute FoF if oGCDs are drifted.
"But which opener is better?"
These openers are meant for full-uptime encounters with unknown kill times, such as P1S. Encounter design, kill times, GCD speeds, and personal/group execution will all influence the optimal opener in any given situation, and encounters with scripted downtime have their own recommended adjustments.
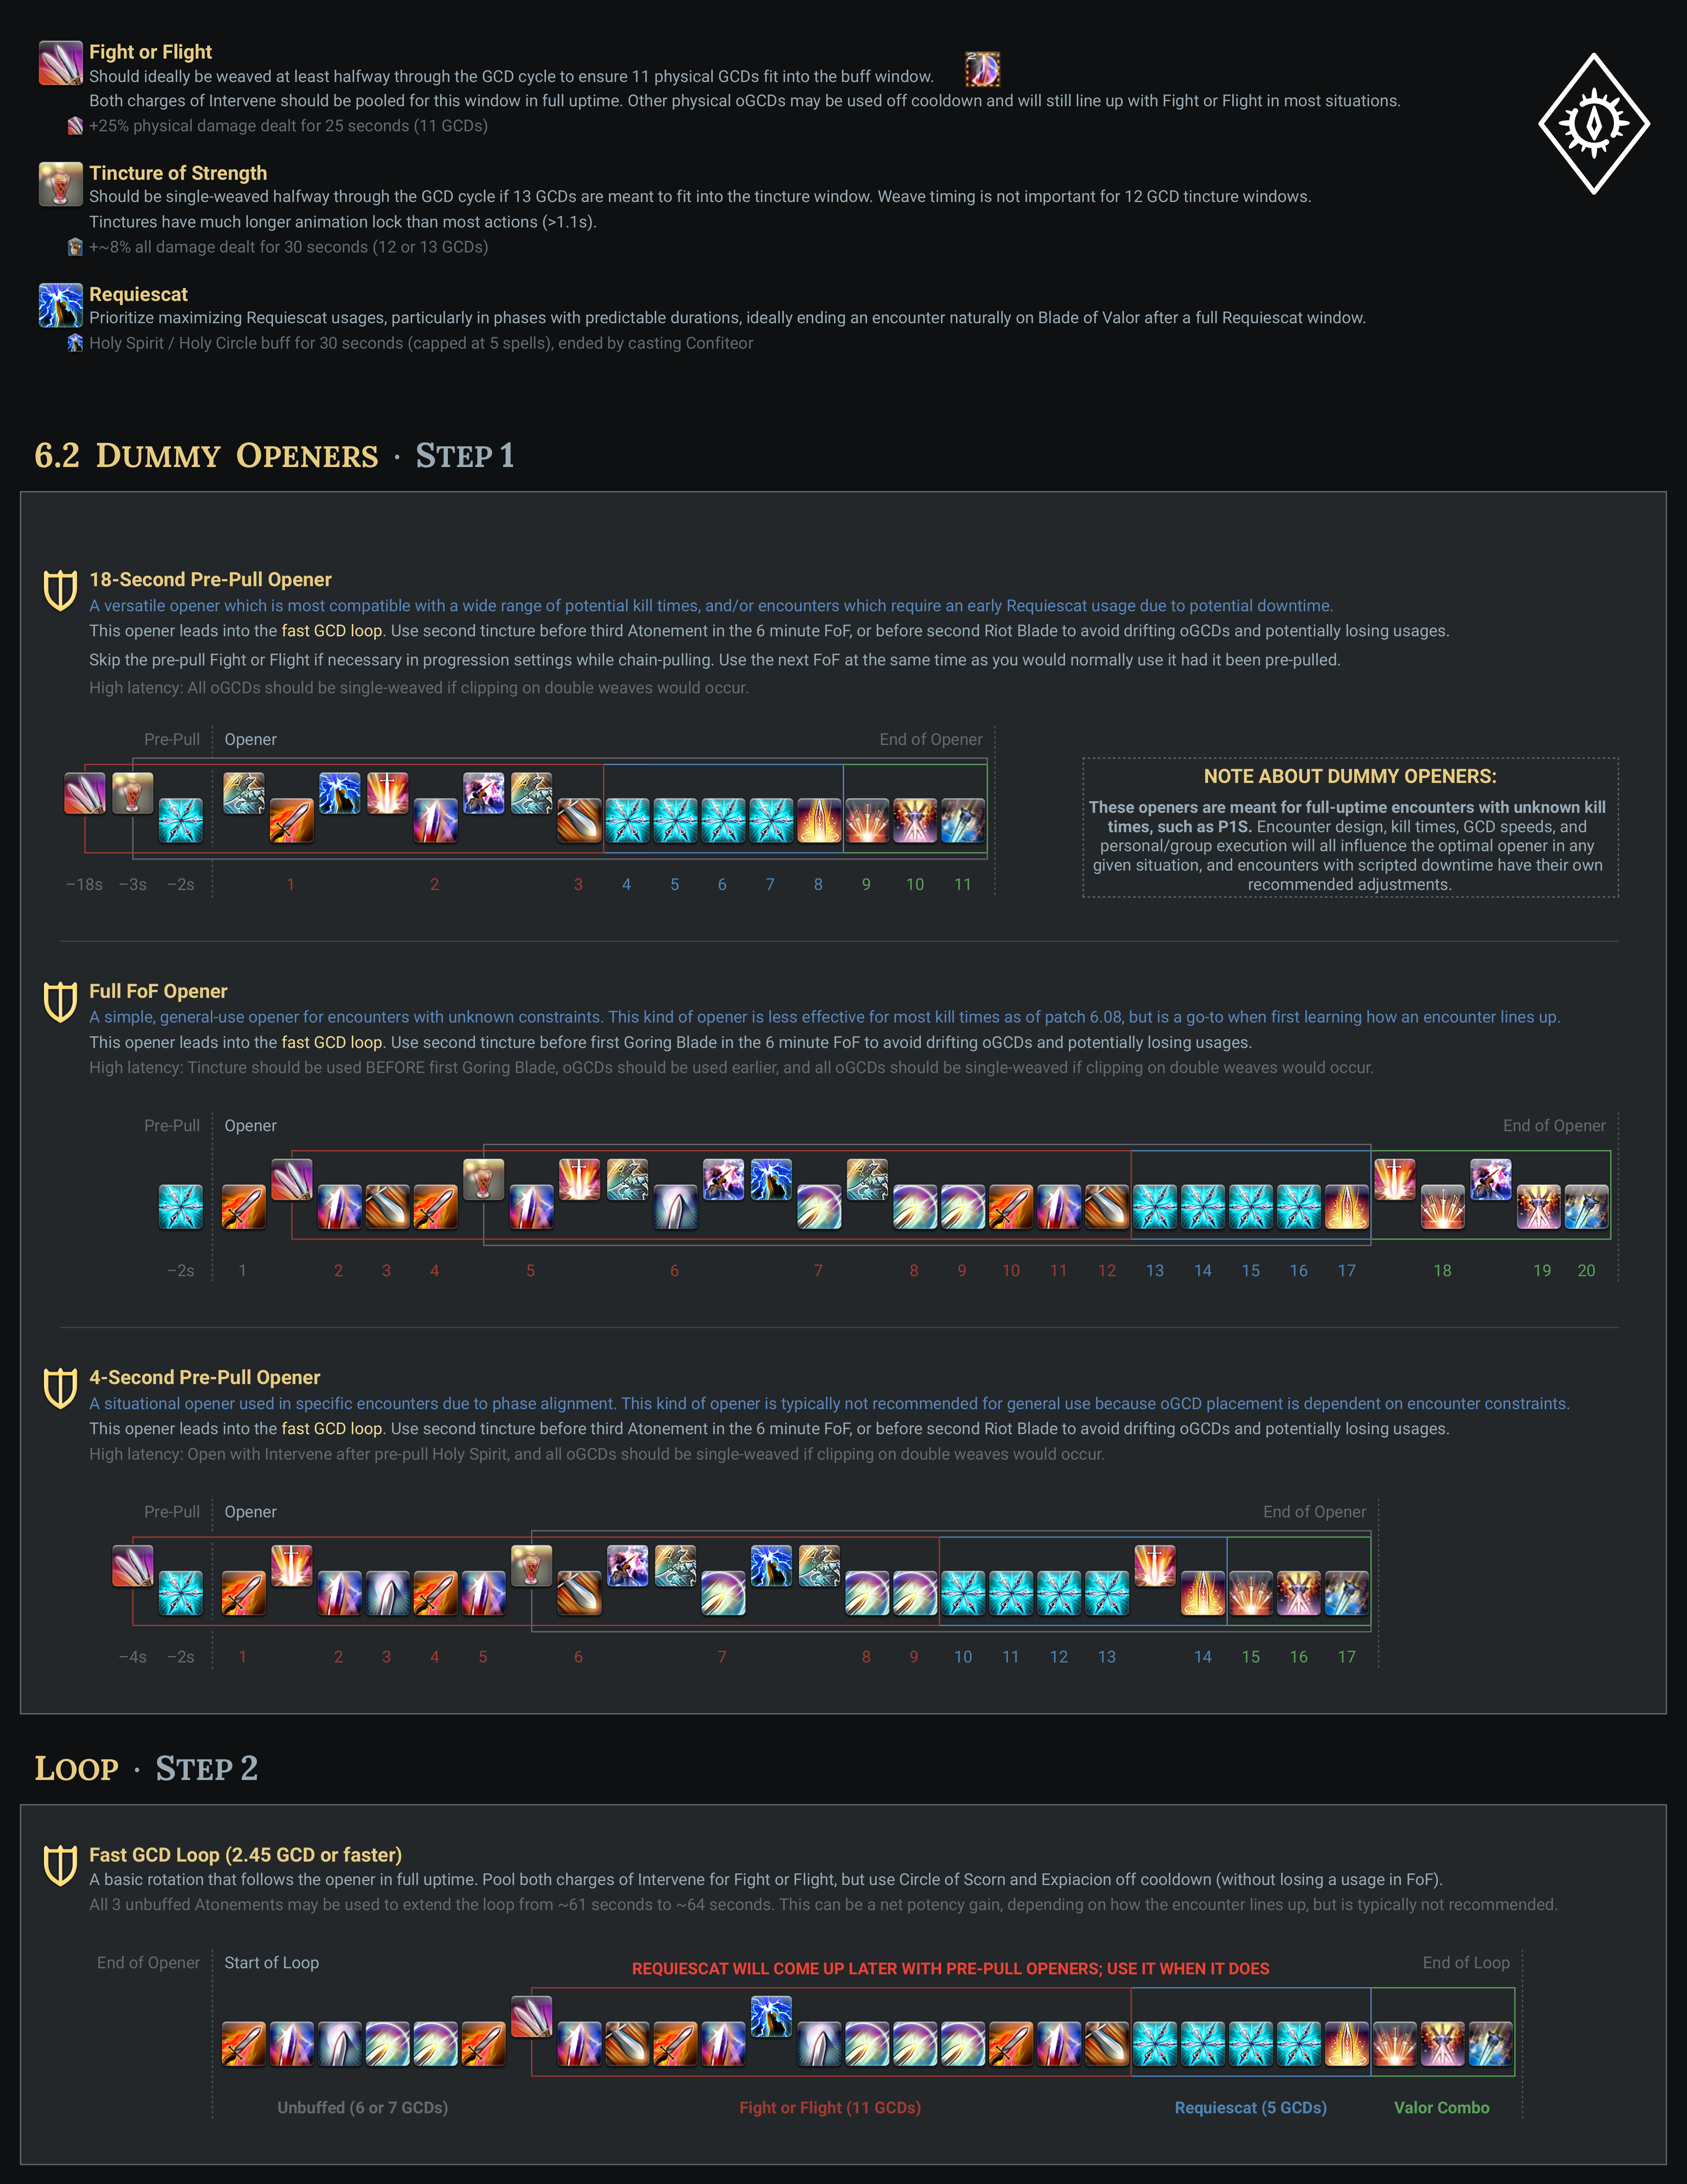
Using Fight or Flight
With a 25-second duration, at most common skill speeds, it is possible to fit 11 GCDs in the Fight or Flight buff window. In the standard rotation these GCDs will be Riot Blade, Goring Blade, a Royal Atonement combo and three Atonements, and another Goring Blade combo. The buff on Goring Blade’s damage-over-time effect (DoT) will persist as long as Goring Blade itself was buffed by Fight or Flight.

In order to fit all 11 GCDs in the buff window, Fight or Flight must be weaved late in the GCD timer. The approximate timing is two-thirds of the way into the GCD after Fast Blade, though the timing may vary depending on your latency and skill speed. As long as the buff icon is on your buff bar when your last GCD is cast, then it was buffed. The in-game battle log and floating damage text are inaccurate for determining whether the last GCD was buffed or not.
Each Fight or Flight window should also contain one Circle of Scorn and one Expiacion. Using them roughly on cooldown should naturally line them up with Fight or Flight. Intervene is ideally pooled for two uses during Fight or Flight, but should be used to keep melee uptime if needed.
Multiple Targets
- At three or more targets, replace single target melee combos with Total Eclipse and Prominence.
- At two or more targets, replace Holy Spirit with Holy Circle.
- In dungeons use Requiescat before Fight or Flight, since it is stronger in multi-target situations.
For prolonged two-target encounters (rarely found outside of Ultimate raids), see the Advanced Guide (Coming Soon!) for more information.
Notable Utility
![]() Divine Veil provides a party-wide shield and heal (excluding yourself) after being procced by any healing GCD with an on-hit healing potency (e.g. Holy Spirit, Astrologian’s Helios, Scholar fairy’s Embrace, and not White Mage’s Regen).
Divine Veil provides a party-wide shield and heal (excluding yourself) after being procced by any healing GCD with an on-hit healing potency (e.g. Holy Spirit, Astrologian’s Helios, Scholar fairy’s Embrace, and not White Mage’s Regen).
![]() Passage of Arms applies a buff to all party members behind you, granting them a 15% reduction in damage taken. The buff lingers for five seconds after you cancel it, so the most common use-case is flashing it onto the party before high raid-wide damage.
Passage of Arms applies a buff to all party members behind you, granting them a 15% reduction in damage taken. The buff lingers for five seconds after you cancel it, so the most common use-case is flashing it onto the party before high raid-wide damage.
![]() Intervention gives your target a buff reducing damage taken, as well as providing a small regen effect. The damage reduction buff can be buffed by having either Rampart or Sentinel active when casting Intervention.
Intervention gives your target a buff reducing damage taken, as well as providing a small regen effect. The damage reduction buff can be buffed by having either Rampart or Sentinel active when casting Intervention.
![]() Reprisal reduces the damage dealt by all enemies around you. Generally use this on raid-wide damage.
Reprisal reduces the damage dealt by all enemies around you. Generally use this on raid-wide damage.
![]()
![]()
![]()
![]() Use your other defensive cooldowns to reduce incoming damage and make life easier for your healers.
Use your other defensive cooldowns to reduce incoming damage and make life easier for your healers.
![]()
![]() These skills are very niche and infrequently used but have their time and place to shine. Clemency is a significant DPS loss but enables soloing dungeon bosses when the healer is dead or saving runs when progging raids and trials. Cover can be used in niche optimization strategies or for saving a party member from otherwise-lethal damage. Covered damage ignores Hallowed Ground.
These skills are very niche and infrequently used but have their time and place to shine. Clemency is a significant DPS loss but enables soloing dungeon bosses when the healer is dead or saving runs when progging raids and trials. Cover can be used in niche optimization strategies or for saving a party member from otherwise-lethal damage. Covered damage ignores Hallowed Ground.
Helpful Macros
Intervention on co-tank
Assumes your co-tank is on party slot 2 (default party sorting)
										/merror off

										/ac Intervention <2>

										/ac Intervention <2>

										/ac Intervention <2>

										/ac Intervention <2>

										/ac Intervention <2>

										/ac Intervention <2>

										/ac Intervention <2>

										/ac Intervention <2>

										/ac Intervention <2>

										/ac Intervention <2>

										/ac Intervention <2>

										/ac Intervention <2>

										/ac Intervention <2>

										/micon Intervention
Mouseover cover
										/merror off

										/ac Cover <mo>

										/ac Cover <mo>

										/ac Cover <mo>

										/ac Cover <mo>

										/ac Cover <mo>

										/ac Cover <mo>

										/ac Cover <mo>

										/ac Cover <mo>

										/ac Cover <mo>

										/ac Cover <mo>

										/ac Cover <mo>

										/ac Cover <mo>

										/ac Cover <mo>

										/micon Cover
Shirk on co-tank
										/merror off

										/ac Shirk <2>

										/ac Shirk <2>

										/ac Shirk <2>

										/ac Shirk <2>

										/ac Shirk <2>

										/ac Shirk <2>

										/ac Shirk <2>

										/ac Shirk <2>

										/ac Shirk <2>

										/ac Shirk <2>

										/ac Shirk <2>

										/ac Shirk <2>

										/ac Shirk <2>

										/micon Shirk
Why are there so many repeated lines?
FFXIV macros do not queue, so hitting a macro while in animation lock from another action will cause the macro to not go off. Since macros execute lines sequentially at around 1 line per frame, repeating the /action lines simulates mashing the ability every frame for ~15 frames and gives the macro a semblance of queuing.
Mouseover? <2>?
<mo> will attempt to target whatever your mouse cursor is currently hovering over when that macro line is reached, whether it be their physical model or a name on your party list.
<2> targets the 2nd player on your party list, which is the other tank by default in 8-man content.
Further Reading
For other questions, check out the Frequently Asked Questions.
For endgame melds and best-in-slot gearsets, see the Current Tier BiS/gear page.
For high-end optimization concepts and/or fight-specific optimizations, see the pages on Current Tier (Savage) and on PLD in Ultimates.