The content below was written for previous expansions and is likely outdated for the current expansion content. The content below are saved purely for archiving purposes.
You can view current content information at the main PLD Resources page.
Notes:
This is a dummy fight, so play for your killtime.
For optimization, the fight is essentially full uptime with centaur 2 skip, so play for your killtime. With fast GCD (2.44-2.45) and seeing enrage, use -4s opener with adjustments around centaur 2 depending on the pattern.
Before quadrupedal with centaur first (spreadsheet)
After (yellow is pot) (spreadsheet)
For centaur second (spreadsheet)
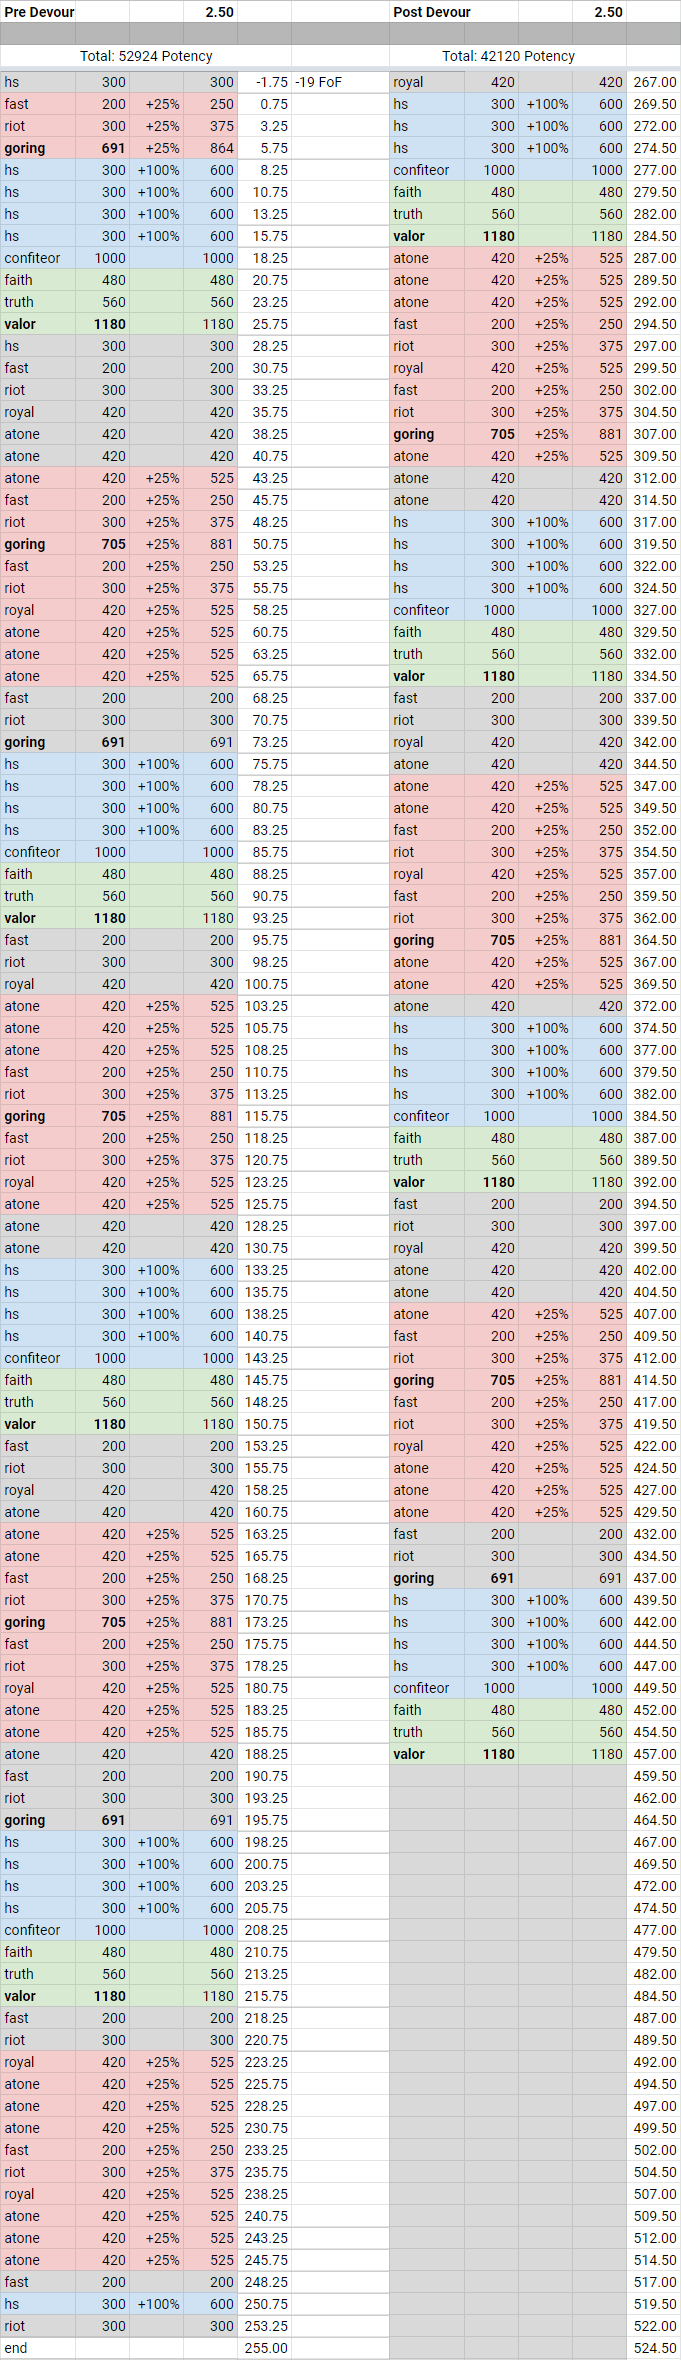
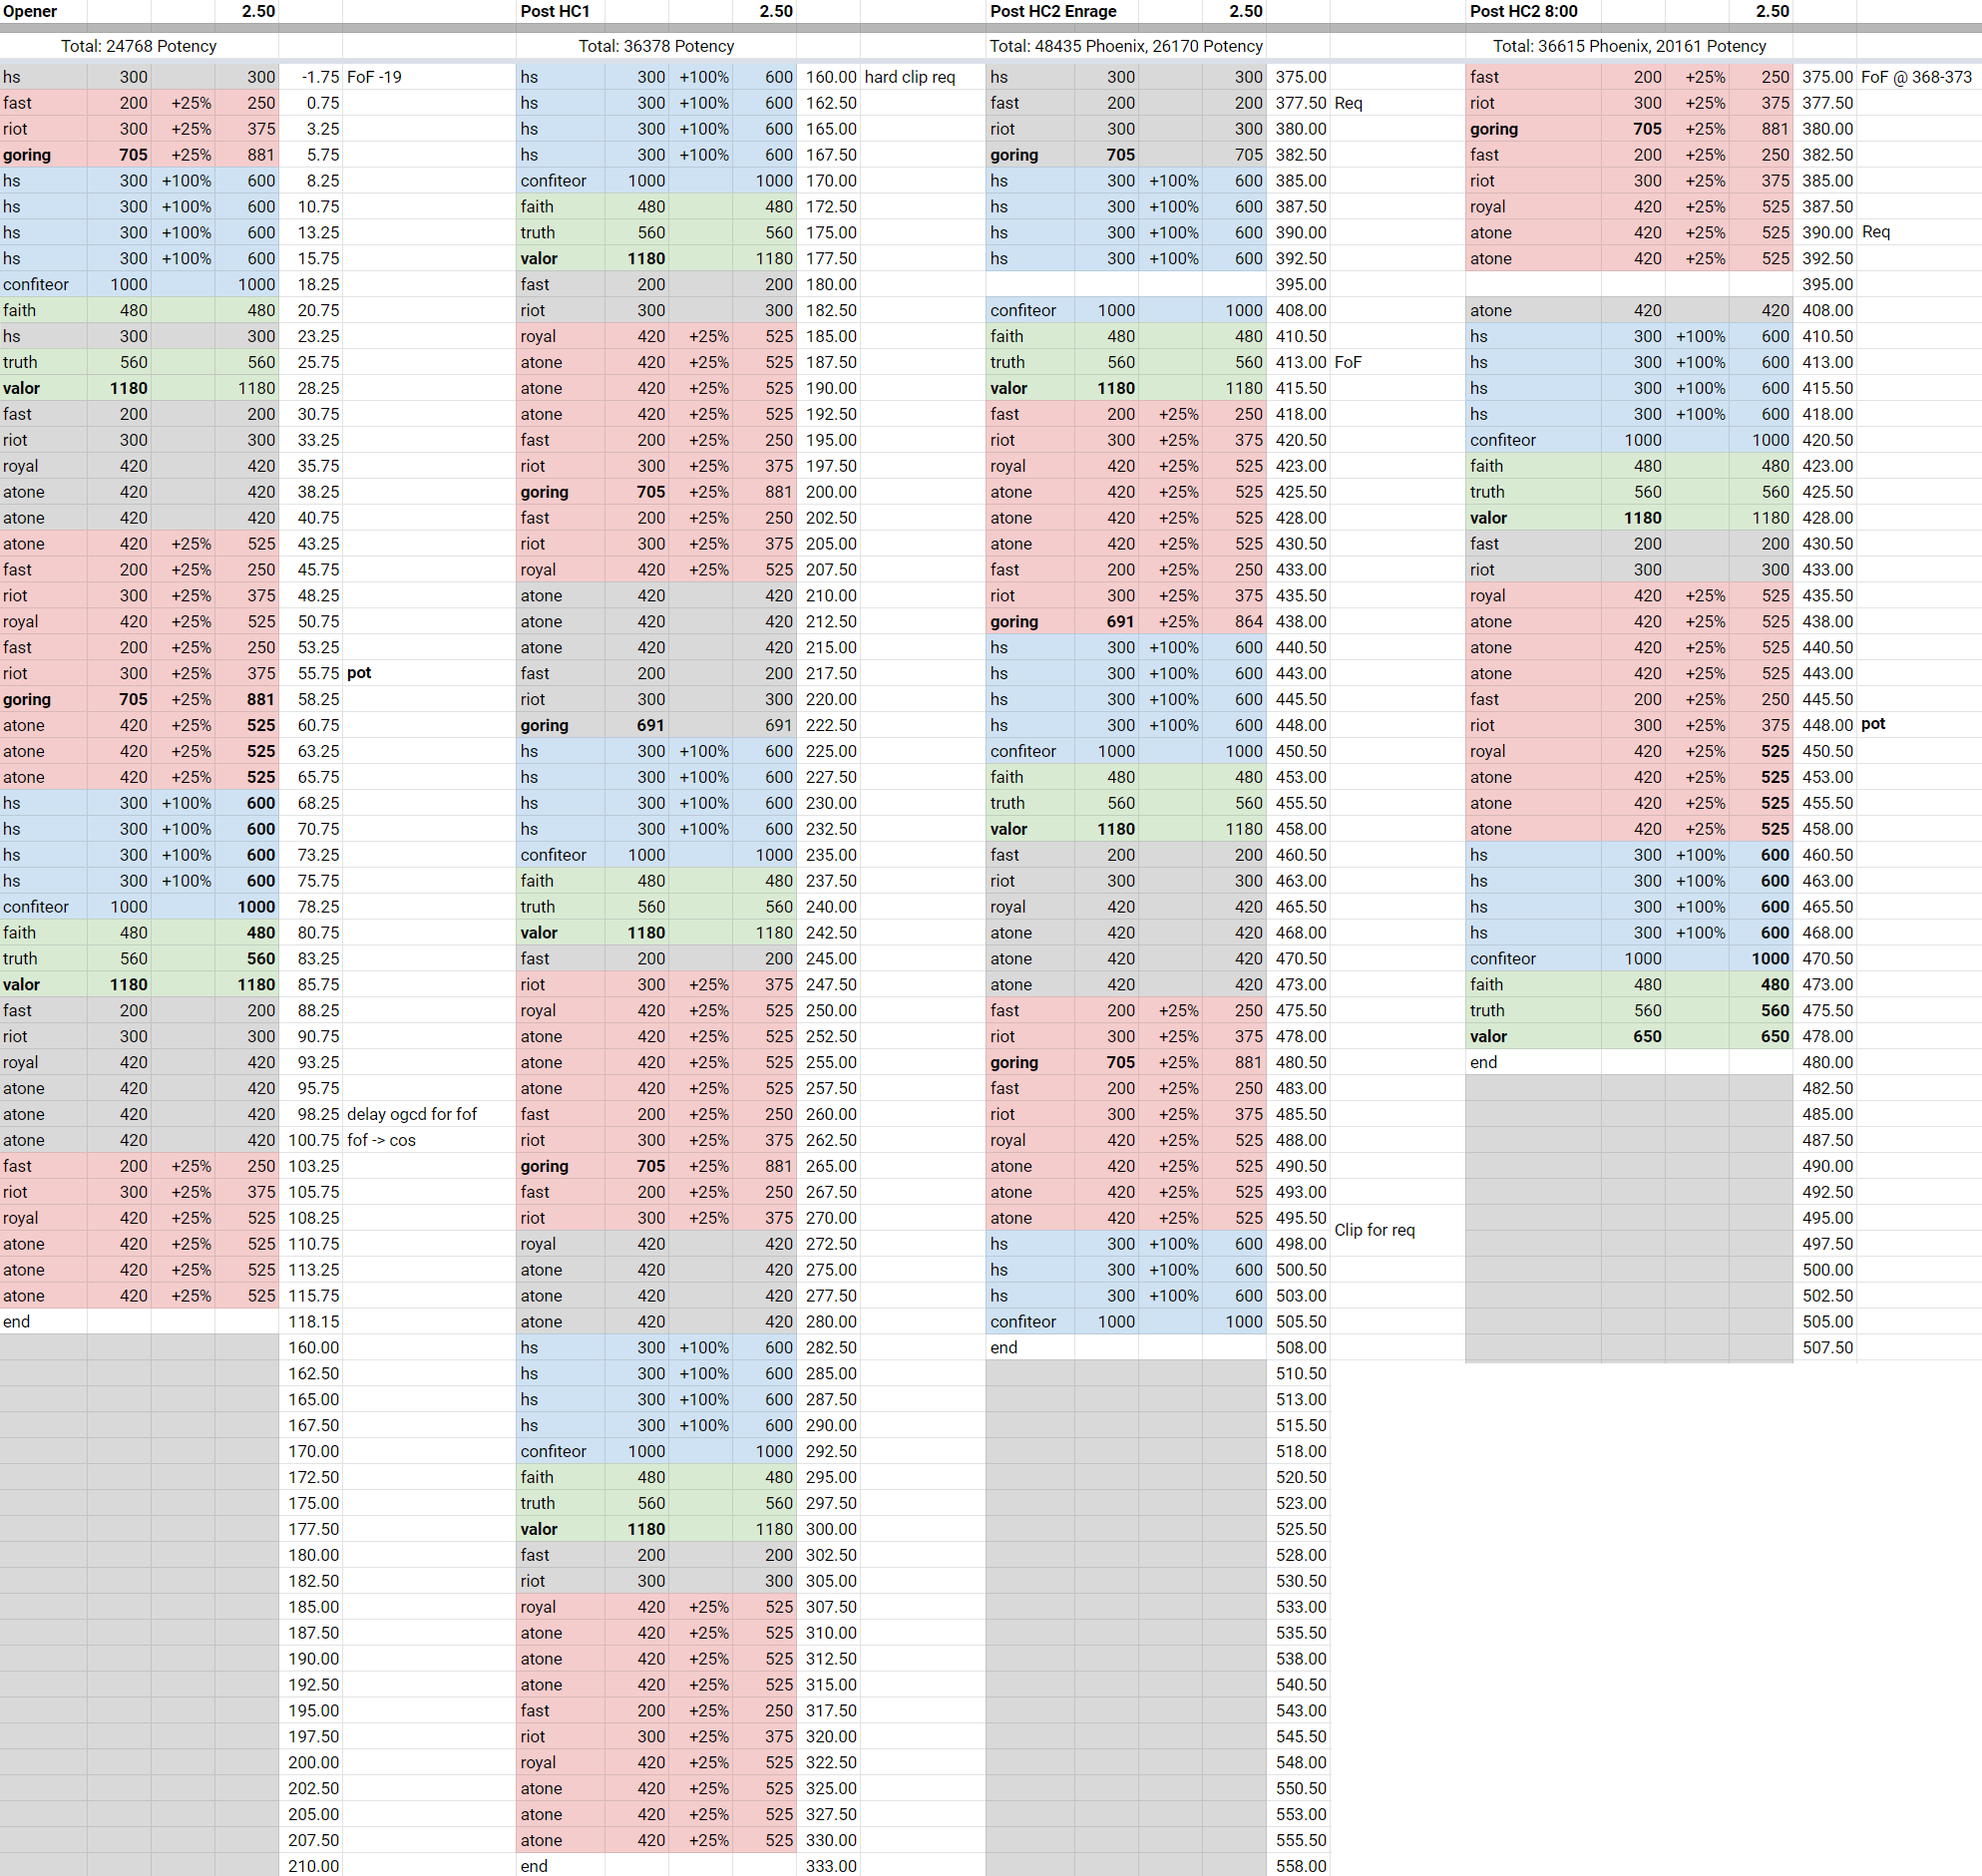
2.50 GCD: fight spreadsheet here. Hardcasted HS can be moved after valor at the cost of a potential goring tick
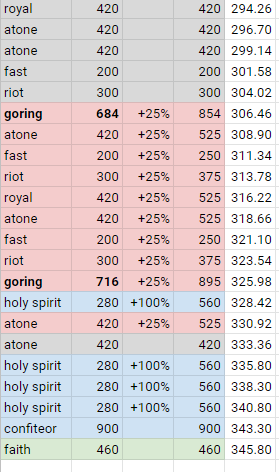
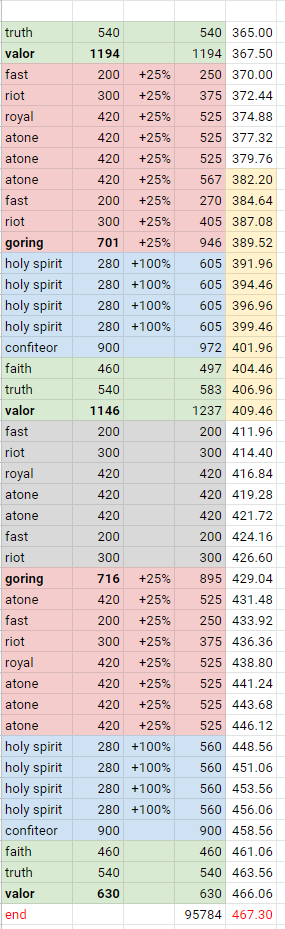
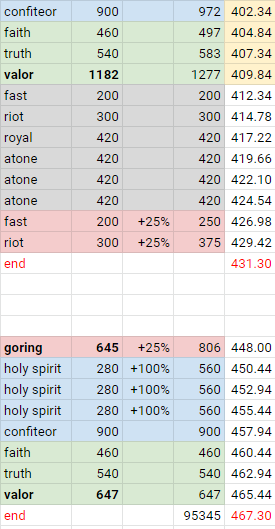
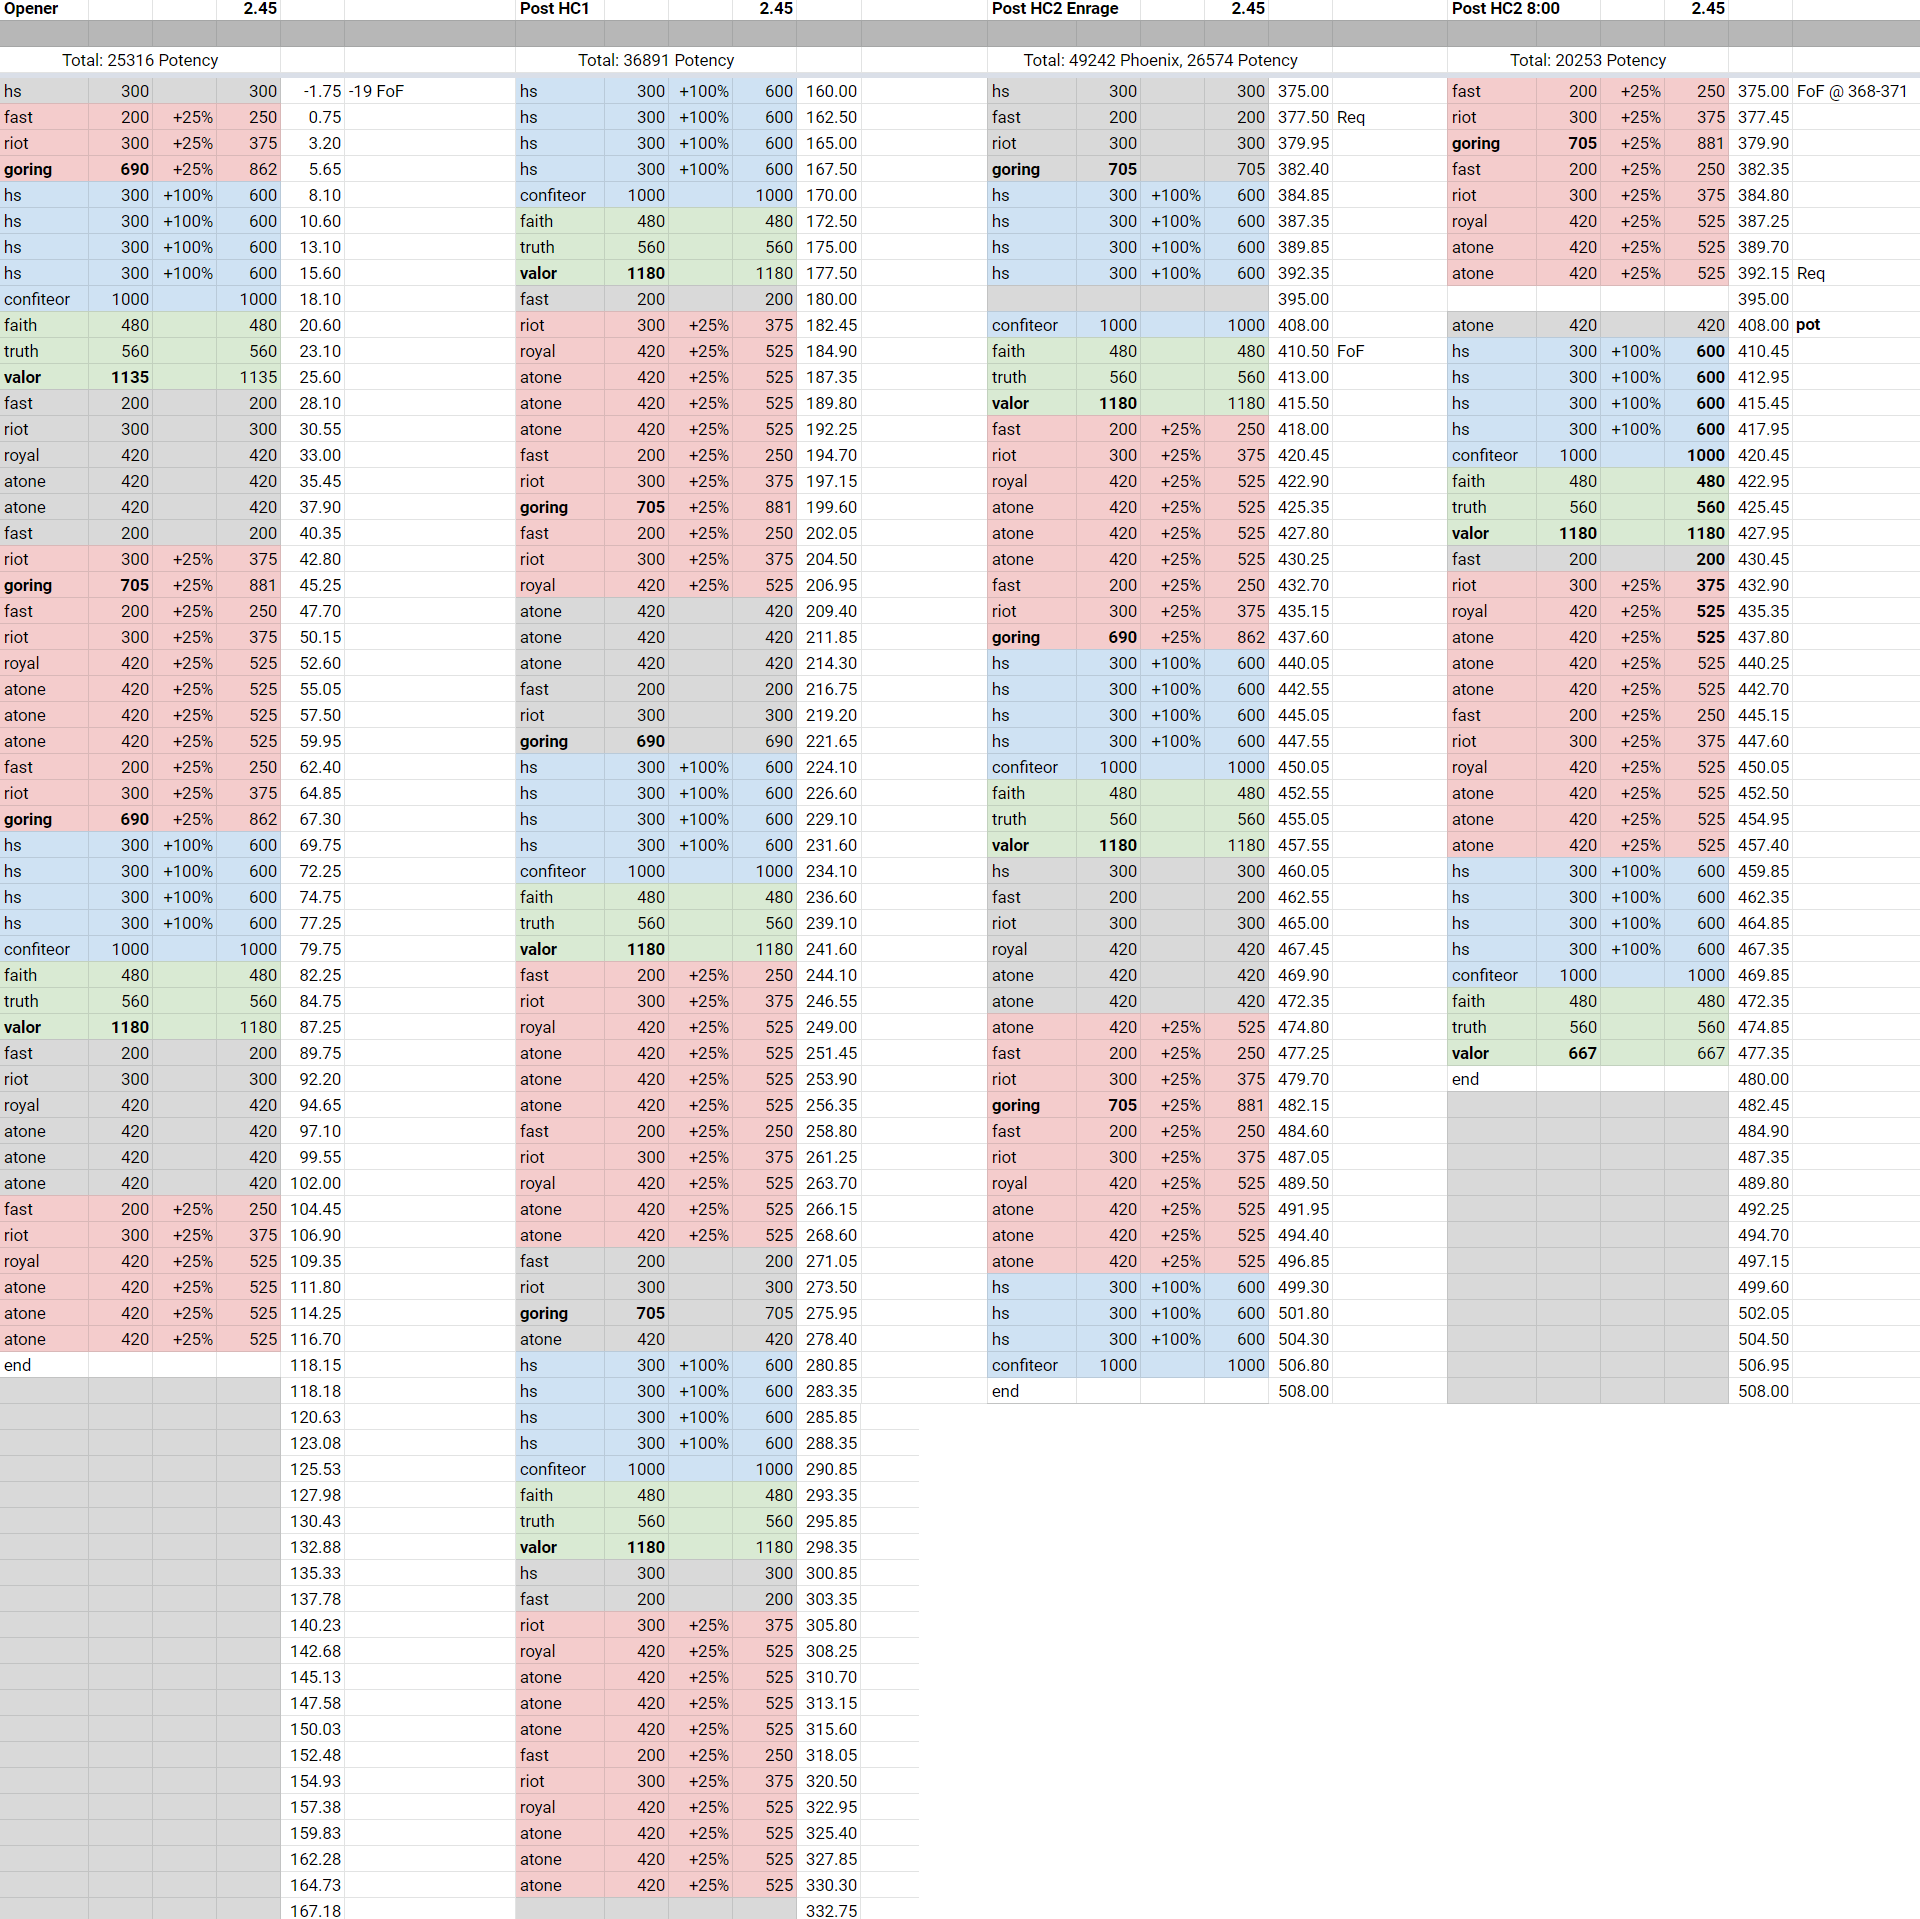
2.45 GCD: fight spreadsheet here
Note: Most sheets assume 2.45 GCD, but 2.44 may be used instead for more lenience in GCD alignment with minimal differences in damage (and weaving, with low latency).
Full-uptime encounter with standard rotation. Use any opener and loop combination that best suits the kill time, if predictable.
2.44 allows full GCD uptime on all knockbacks with -18 second pre-pull FoF and face pull (run in from close range without pre-casting).
Requiescat lines up cleanly with all potential disengagements. Keep all oGCDs on cooldown.
Add a filler Atonement immediately before 3rd Channelling Flow at 2.44 GCD, due to an extra GCD being possible in this phase compared to 2.45.
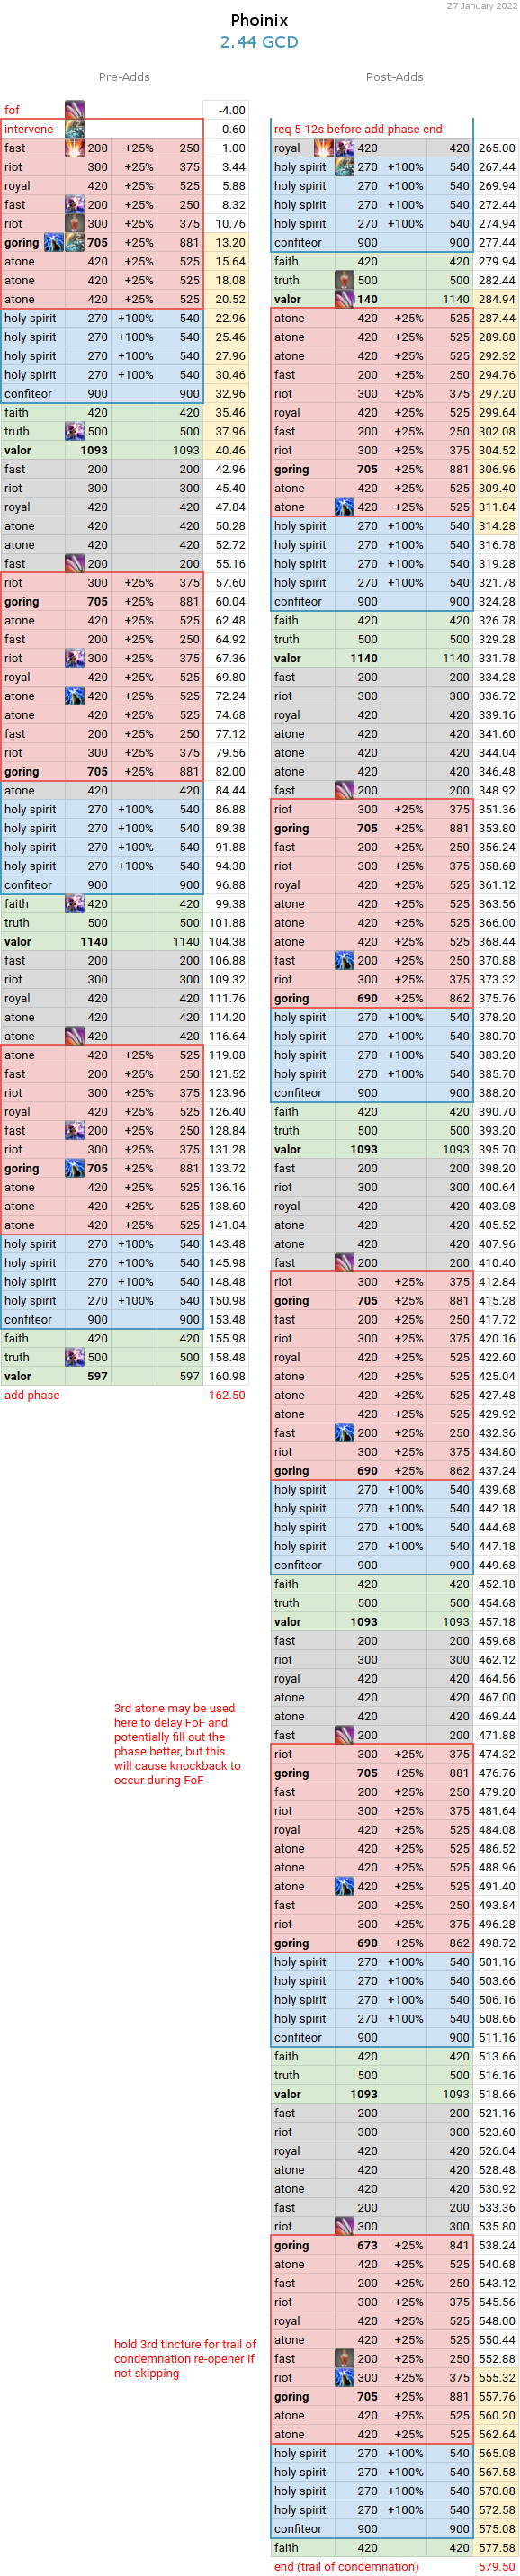
2.44 GCD: fight spreadsheet here
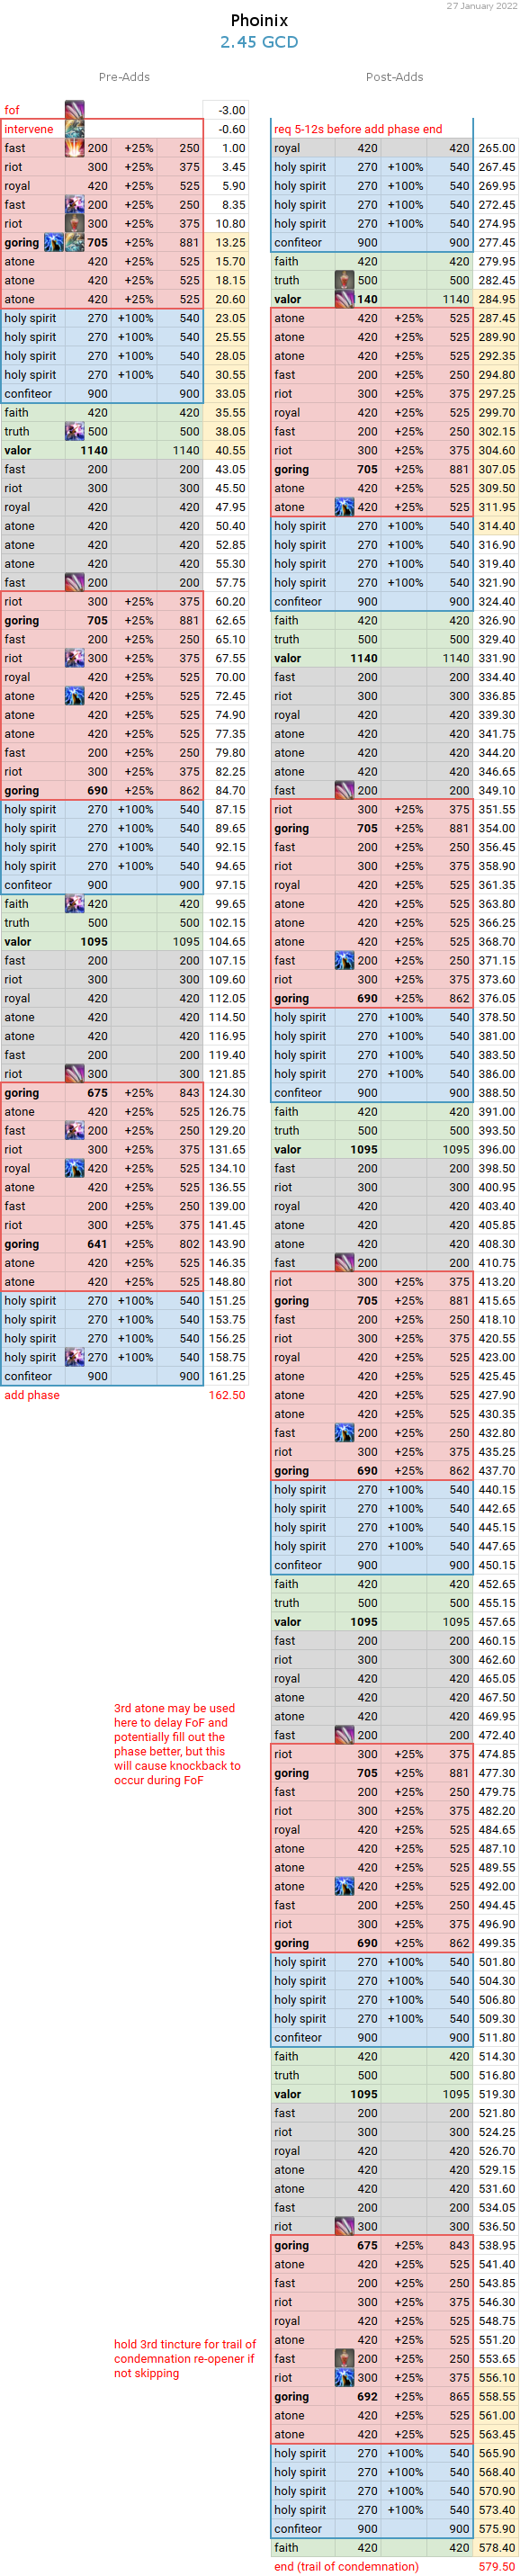
2.45 GCD: fight spreadsheet here
This encounter is sensitive to add phase kill time. Plan to use Royal Authority as the first GCD after add phase, and ensure Requiescat is used within the 5-12 second window before the last large bird dies. Tincture windows may not be ideal, depending on add phase and encounter durations.
First phase timing is very strict. Pulling with Intervene is recommended to avoid ghosting the last spell at the end of the phase. Keep all oGCDs on cooldown.
Alternative first phase options exist for padding Darkened Fire with spells, such as using -18 second pre-pull FoF opener. Later phase setups do not differ.
18-second pre-pull FoF opener with strict 61-second loop and all oGCDs kept on cooldown will gain usages at enrage, while also ensuring full GCD uptime during all mechanics (except 1st sets of tiles). Use a Pinax strategy that doesn't result in melee downtime for the 1st sets of tiles. Use 2nd tincture in FoF during 2nd Pinax (at ~6 minutes).
This timeline assumes forced disengagements during Act 2 and Act 4. Fight or Flight and Requiescat are both delayed at certain points to ensure full GCD uptime during these mechanics, while other oGCDs should be kept on cooldown. Use 2nd tincture in FoF during Finale (after 5 minutes), or risk downtime in tincture during Curtain Call.
If using a full-uptime strategy for Act 2, use 18-second pre-pull FoF opener with 1st GCD Requiescat (similar to P2S) and possibly Intervene pull with no pre-cast. Keep Requiescat on strict cooldown to gain a usage before disengaging for Act 4 (at 2.44 GCD or faster).
-18s prepull, pad on all 4 orbs with Total Eclipse, Prominence, and Holy Circle (stand right in the middle on the red dot). The spot is pretty precise and you may not see damage numbers show up, so check on a log. Spreadsheet likely won't be coming due to the large number of variables (especially add kill-time).
Example log (view with a grain of salt, may not apply to your run due to adds kill-time, boss kill-time, etc.): https://xivanalysis.com/fflogs/HfwZdcXRW96ayP1z/18/393
-18s prepull, hit Requiescat before adds transition to pad on adds with two Req usages.
Adds and post-adds may need to be adjusted for faster or slower kill-times.
Example log (view with a grain of salt, may not apply to your run due to adds kill-time, boss kill-time, etc.): https://xivanalysis.com/fflogs/v7MyRXpgkhaJWVmL/2/1